Create your own banner at mybannermaker.com!

Monday, March 30, 2009

Beading For A Cure Project Finished


Here is the final piece of the Beading for A Cure 2010 Auction. The top is not sewn together, so you can just slip a picture into the frame.


This is what it looks like with a picture in it:


It feels good to get this set completed. I love the way it looks together.


Another set is definitely on my 'to do' list. I have a project I need to start working on for a family celebration in July. I can't really say too much about it, since it's a surprise, but I'm guessing it will take me a fair amount of time to get it all done. So between that and my knitting addiction, and the spring weather waking up my perennials, I will have more than enough to keep me out of trouble.


Oh, and I picked up these goodies this weekend at the Gem, Fossil & Mineral show that are just begging to be made into a collar (another thing I've always wanted to make):




Friday, March 27, 2009

I got mail!

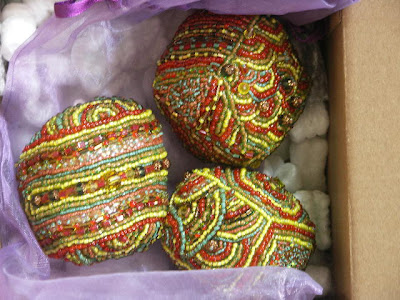
I was the lucky high bidder on a BFAC auction and it came today. These little cubes are so much fun!!! :) :) :)

Don't miss out on your chance to get something too - go bid today!

Thursday, March 26, 2009

Beaded Birds


I'm still relishing in the return of more and more birds to my yard. I wish you could hear them. Between the finches, nuthatches, cardinals, bluejays, sparrows and starlings, all talking at the same time, I just love it! It's a riot! Brings a smile to my face everytime I walk out the door.


In that spirit, I am going to show some of the birds I've beaded over the years.


The little yellow guy above and the owl below are part of a 4-Seasons collar.


The little bird represents Spring;
the owl, Winter;
a butterfly for Summer;
and some stylized leaves for Fall.

The little peacock-looking friends below adorn a boot which is actually a sewing caddy. The pattern allows a pair of scissors to fit behind the top cuff and it is stuffed to accomodate many many pins behind the cuff. I've never used it as intended, it just hangs on the wall of my studio.


My daughters each have a bird for which they chose the colors and the tail design.


Meghan asked for turtles.


Hannah wanted a butterfly.


Claire's features a dragonfly. She still has her bird hanging in her room. I figured I didn't want to venture in there to get it. Sometimes her room leaves me stressed (she's 17 - need I say more?)

Tuesday, March 24, 2009

The Muse is Revealed. . .


Finally the Muse has been revealed. Gosh, it was killing me to keep this underwraps. For those of you who don't know what I'm talking about, I entered a design contest and one of the elements had to be kept secret until the winners were announced. The kit included crystals, bugles, seed beads, a little heart lock, a piece of suede, pearls, brass rounds, and delicas. We could incorporate anything we wanted, and the finished piece had to be "wearable art."


This was the muse: a brass filigree piece. I started by mounting it on velvet and embellishing around it.


I edged the diamond in a piece of vintage (machine made) lace.


Next I made a 3 dimensional flower that I immediately thought of when I saw the muse. I learned this flower in one of the Native American bead classes I had taken. LOVE the colors!


I was looking for another 4-sided 'something' in my stash and came across a 4-sided coin from India. So I put that on another velvet diamond.


I wasn't sure how I was going to put the 3 diamonds together. In the end I decided to hang them largest to smallest from the suede piece and backed them all in a rose ultrasuede.


Here I am wearing it -
although I like it hanging in my studio better
because then I can actually see it!
I am sure I will spend a lot of time drooling over
all the other entries. They are all spectacular!

Thursday, March 19, 2009

BFAC Box


After adding the bottom border, I am very happy with the way it ties into the top. I added some beads for feet, and I'm ready to start the picture frame to finish off the set.

Don't forget to check out this year's auction items. One is prettier than the next - so don't miss out on supporting this worthy organization!

Decorate and it will come!


Yes! I put up my Easter and Spring decor, and Spring Came! My Crocus are blooming and my birds are returning in bigger numbers.


Even the gold finches are flocking back. I get a few over the winter, but during the summer, I will get whole flocks together. Here are 6 of them that I caught at my feeder from my upstairs window. I had to zoom the picture in, so it's not the best quality, but there are 5 at the feeding stations and one at the top of the hook. They are quite chatty, and have the cutest songs. There were chickadees around too, so between their peep-peep-peeps and the finch chorus, it was great!


A big THANK YOU to everyone who voiced their opinion on my BFAC box. I'm planning on working on it a bit today, so I will post the progress soon. You were all a big help and I really appreciated the input. Sometimes you just need a second (or third, or fourth, etc ) pair of eyes!

Tuesday, March 17, 2009

Opinions Needed !


I'm debating whether or not to bead the sides of this box for the Beading for a Cure project.

What do you think?

Saturday, March 14, 2009


Still in the process of changing over the house to Spring. It always fun to revisit things I haven't seen in a year.


I made these two whimsy pillows back in 2006. The egg below is schneeberger bobbin lace. Not my favorite type of lace to make. It's very flismy because of all the open space which is made by twisting the threads.


Everyday more and more birds are returning to the area, so I just know Spring is right around the corner.


Thursday, March 12, 2009

Time for A Change


I spent the majority of the day packing away my winter-themed decorations, as I just know Spring is going to arrive any day.....even if it is only 20 degrees today!


Here are some of the snowflakes I've made using a Bead & Button pattern. I had made literally dozens of them back in 2004 for Operation SOS, which was a letter writing, care package sending initiative to Support Our Soliders fighting the Iraq War. My daughter's teacher got the program off the ground, and I'll tell you it was one of the best things I've been involved with. The way the children and the soldiers became pen pals and how appreciative they were of the small gifts they received really brought the experience home. Soldiers Rock! and don't ever let them forget how much we appreciate their sacrifices.

Wednesday, March 11, 2009

Thinking Ahead


After admiring the work from the Beading for a Cure auctions, I was lucky enough (thanks Grace) to get in on the 2010 fundraiser.


Here are the beads we were all given to work with. The only rule is that you have to use at least one of every kind of bead. Considering how beautiful each of them are, that's not a problem


I settled on making a "desk set" of sorts, which will consist of a post-it-note pad holder, paperclip holder and a picture frame.


I decided to start with the post-it-note holder which is like a little book. I used heavy peltex covered with black velvet. I placed an outline on both the back and front, which are similar to each other, but not exactly the same. Here's the beginning of the outline (I just hate the way the lint looks in the pics!)


After putting down a paper template, I worked up the center of the flower, using the chase me around stitch with each row's bead count increasing, making the center rise up, topping it off with a crystal. Then I outlined the center to keep everything nice and snug together, so it looks really compacted.


Onto outlining of the flower petals.


After filling in the petals, it seemed a little blah.


So I added a row of bugle bead petals. A bit of an overkill, but I left them.


I added some little buds and vines around the flower and put a little 'title' down the spine.


I mounted the cover onto very heavy board - two panels for the cover and one for the spine. I folded the velvet under and added a fabric liner with a pocket to hold the post-it-note pad in place.


Then I edged the entire book with a 2-bead edging.


Next up - the paperclip box!